Oriyarasoi is on twitter !

Showing posts with label vegetarian recipe. Show all posts

Wednesday, December 15, 2021

The Curious Case of the Banana Peel and other Slippery Tales


Nigella Lawson discovers banana peels are edible! "Eu tu" lauds the universe when all I want to scream is "Déjà vu"? And I do speak for myself or rather that part of the world which my ancestors inhabited. That little dot on the map that I would still call home even if I lived halfway across the globe. And follow that unwritten code of existing in harmony with nature that they had advocated. For long long ago when GM foods were not even conceived and the green revolution in India had not brought about substantial change in our food habits, my ancestors had exhibited the highest degree of reverence for every scrap of food. The concept of peeling fruits and vegetables was limited and applicable only to those that had been rendered inedible by the presence of a hard and/or hairy exterior or even certain And those habits were honed further by the periods of drought or famine that routinely ravaged the area.

But with the advent of modern methods and technology, there was enough food for everyone. And even more to waste for those who could afford it. Cosmetic or rather aesthetic approaches crept into the Indian kitchens. Those mud-stained layers that betrayed the origins became an eyesore. And peeling those ugly outer layers became the norm. Catalyzed further by those glossies with their borrowed ideas of good food and nutrition that had started invading at least some of the middle-class homes. Never mind in the process we were generating more and more kitchen waste. It would take a couple more decades for people to awaken to the problem of landfills and the leaching Methane punching holes in the Ozone layer. 

Getting back to those slippery and not so slippery peels, they have always enjoyed a lot of respect and adulation in Odia cuisine, often with a separate mention of the properties of the peels in traditional medicine. It won't be an exaggeration to claim that there is a whole genre of recipes centered around the now discarded peels. Interestingly there is one that is even offered to the Gods. Peels have always been minced, ground, crisped, or curried into various delicacies. Especially those of the gourd family and of course those of the banana/plantain.

While I already have a couple of them on the blog, this is one that is the easiest to prepare and needs no cooking. 

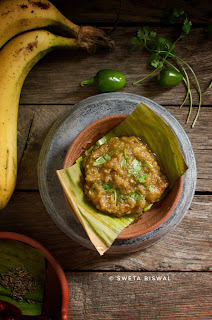
Ripe Banana Peel Chutney

This is usually made with the banana varieties having yellow or light green peels. Pick organic bananas that are completely ripe and unblemished. 

Ingredients -

1 Ripe yellow banana 

1 garlic clove

1 green chili ( or 1/4 tsp chili flakes)

1 tsp jaggery 

1/2 tsp Tamarind paste

1 tsp chopped cilantro

a pinch of cumin powder

1/3 tsp salt ( adjust as per taste )

Preparation -

Peel the banana and snip off both ends. Chop the peel into smaller pieces.

Transfer the chopped peel to a chutney jar or small mixer jar. Add all other ingredients except the cilantro. Give it a quick buzz. The texture need not be very smooth. 

Taste and adjust the salt/jaggery/heat. 

Can be served as a side during the meals or as a dip with snacks. 


The plantain peels on the other hand can be prepared using this recipe.

Still curious? Read on to find out a whole range of recipes derived from the different parts of the banana/plantain plants which was a permanent fixture in most Odia homes.

Wednesday, March 8, 2017

Zero Oil Matar Paneer ( A Women's Day Special )

"Do I look fat in this dress ?"

"If my hips were smaller, I could easily slip into size 30 jeans !"

"This orange saree is so pretty. I wish I were fair enough to wear it ."

Doubts, doubts and more doubts. I wish we women had a genie who could appear by magic during moments like this and make us slim/tall/fair/whatever. But since that seems so far fetched a true friend will just about do. Someone who tells us stuff like  "Hey no problem . Just buy the next size" or "This looks so nice on you. The orange actually compliments your burnished skin tones.".

But since it is emotionally taxing for another person to continuously address our insecurities, every women needs to learn to love herself irrespective of shape, size or skin color. Because only then will you be allowing your inner beauty to shine through. Beauty that is sublime and yet radiates from within. The kind of beauty that transcends the passage of time and is able to reach the core of even the most hardened of souls. The kind of beauty that has the power to transform. To bring about a change in the way we perceive and act.

This women's day is yet another occasion when we can help it happen. By appreciating and helping ourselves. Not by merely sprouting mere rhetoric but actually reaching out and helping other women in every possible way that makes a difference. However small.

Dedicating this 'Zero oil Matar Paneer' recipe to all the women. Not because they need to lose weight in order to meet someone's approval. But because they need to stay fighting fit. For, whatever be our position in life or society, women never have it easy.

Read on for the recipe -


Preparation Time - 20-25 mins (plus 5-7 mins standby)

Ingredients -
  • 200 gm Paneer / Cottage cheese
  • 1 medium sized onion
  • 4-5 garlic cloves
  • 1 inch ginger
  • 1 mediun sized tomato
  • 1 cup green peas
  • 1 inch cinnamon
  • 1 green cardamom
  • a tiny bit of mace
  • 6-7 peppercorns
  • a pinch of fennel
  • 2 pinch cumin seeds
  • 1-2 dry red chili 
  • 1 tsp kasuri methi
  • 10 raisins ( else add 1 tsp honey just before taking off the flame )
  • salt to taste
  • 1/2 cup milk (optional)

Preparation - Take all the ingredients except for the paneer, kasuri methi and milk in a pressure cooker. Add 1 cup water and a little salt.

Close the lid and cook for 2-3 whistles on medium flame.

Remove and keep aside till steam escapes. Open lid and drain the excess liquid into a cup . Once cool, puree the solids.

Add a small cube of paneer ( 1 inch ) to the blender jar and give another quick buzz.

Heat a wok. Transfer the puree to the wok along with the green peas and let it cook till any raw smell goes off (takes about 5 mins).

Add the reserved liquid and the milk to the wok. Rub the kasuri methi between your palms before adding them to the wok. Let the gravy simmer for 4-5 mins .

Add the paneer cubes. Switch off the flame immediately and let it stand for 5 mins before serving.

Taste great with Indian breads or steamed rice.


Tuesday, January 10, 2017

Baba Ganoush ( Culinary cousins and random ruminations )

Baigana Poda or roasted aubergine is one of my favorites winter recipes. This typical Odia recipe is characterized by the frugal use of seasoning. Just some green chillis, chopped onions, garlic, salt and a dash of mustard oil to compliment the smokey sweetness of the tender flesh. Nothing that would reminds one of the more flamboyant 'baingan ka bharta' .

But in the food-scape of this vast universe, culinary cousins keep popping up here and there. Sometimes at the most unexpected of places. Whoever would have thought that another frugal 'roasted aubergine' recipe would find so make takers in a land that is better known for it's baklava and Shawarma. The 'Baba Ganoush' is nothing but a mellower cousin of the fiery 'baigana poda'. The ingredients, olive oil, tahani (sesame paste ), garlic, lemon juice and cumin, are almost banal for the residents of Lebanon. Just as mustard oil, onion and garlic are for most odia folks.

Mellow, smokey and infused with just the right amount of pungency, the Baba Ganoush is the perfect definition of comfort food when served with some pita bread. Read on for the recipe -


Preparation Time - 35 mins

Ingredients -


  • 1 big aubergine (around 300-350 gms)
  • 2 tbsp tahini paste
  • 2 tsp lemon juice
  • 2-3 garlic cloves
  • a pinch of roasted cumin powder (optional)
  • 1 tbsp extra virgin olive oil
  • salt to taste
  • parsley for garnishing


Ingredients - Wash the aubergine and pat it dry with a paper towel. Rub a few drops of olive oil all over it and place it on the burner . Grill on medium flame till the skin starts to peel off.

Wrap it up in aluminium foil and place it in a pre-heated oven. Roast at 200 C for 20 mins.

Remove and take off the foil. Keep it aside on a plate for 10 mins to let the liquid ooze out of the aubergine. Discard this amber colored liquid along with the blackened skin.

Place the tender flesh in a bowl and mash it up with a heavy fork.

Add the tahini, lemon juice, cumin powder and finely crushed garlic to the mashed aubergine. Season with salt and mix it up with the fork.

Finally drizzle the olive oil on top and garnish with parsley.

Serve immediately with the Pita bread or even some chips.


[ Cover with a layer of olive oil and store it in the fridge up to 5 days. Bring to the room temperature before serving. ]

Tuesday, November 1, 2016

Mushroom Paneer Masala ( And a box full of Nostalgia )

One of the most wretched things in life is perhaps being away from loved ones during the festive season. I was feeling completely heartbroken as this year work commitments kept us from visiting our hometown during the Dusshera celebrations.  The new clothes were there, the sweets were there and quite a number of bedecked pandals were strewn all over Bangalore. But the close ones with whom we would have loved to share all this were missing. I guess that is the thing about joy. It multiplies manifold when shared.

Hence, when a beautiful green colored box arrived one afternoon, it stirred memories of celebrations back home. As I opened the box, the delectable 'Tata Sampann' spice packets tumbled out unleashing a floodgate of nostalgia. 'Paneer Masala', 'Dal Takdka masala' and 'Punjabi Choley Masala' reminded me of the delicious vegetarian meals cooked by my 'mausi' and 'mamis'. With schools being closed for Dusshera vacation, all of us would gather at 'mama's' place for fun and food. With so many people in the house, the kitchen hardly got any respite. The younger lot of ladies would be in charge of whipping of the meals while my 'nani' took to keeping an eye over the kids. The terrace would be lined with the freshly dug turmeric and red chillis, which in turn attracted our curiosity. While in those days I clearly remember sulking over not being allowed to play with those spices, today I realize that their tantalizing culinary creations carried the magical touch of these home ground spices.
Each individual use sachet of TATA Sampann seals in the same freshness of the best quality spices that still retain their natural oils which are responsible for that unmistakable aroma of the home ground spices. These spices are further sourced from the best farms and are 100 percent sterilized to ensure complete safety for one's family. Plus the signature 'masalas' are developed under the expertise of Chef Sanjeev Kapoor who is a name to reckon with.


Given our hectic lifestyle and the obvious absence of a terrace to carry out such ventures, I could never imagine creating those magical concoctions in my own kitchen. But as I cut open the carefully sealed spice packets from 'Tata Sampann', the heady aroma and the striking hues made my head spin. 'Sampann' literally translates into rich and that it exactly what these spices felt like.


I prepared a simple meal consisting of a mushroom-paneer curry, dal tadka , steamed rice and salad for our 'Dashami' lunch. Tantalizing aromas enveloped the entire house even as I added finishing touches to the spread. Some of it even escaped to tease the neighbors, and in turn, prompting queries like 'what's special today ?'. And needless to say, my family had one of their best meals in the recent times.

Read on for the recipe for Mushroom Paneer Masala, a dish that never fails to invoke my childhood memories -


Preparation Time - 30 mins

Ingredients -
  • 200 gm paneer
  • 200 gm button mushrooms
  • 1/2 sachet of Tata Sampann Paneer Masala
  • 2 tsp cream (optional)
  • salt to taste
  • 1/4 tsp Tata Sampann turmeric
  • 1/2 tsp Tata Sampann red chili powder ( adjust as per taste )
  • 2 pinch garam masala
  • 3 tsp oil
  • 1 tsp butter (optional)

For the gravy -
  • 1 large onion ( cut into chunks )
  • 10 garlic cloves (peeled)
  • 1 inch ginger ( peeled and chopped into juliennes )
  • 2 small tomatoes
  • 2 pinch salt 
  • 1 green cardamom
  • 1/2 inch cinnamon
  • 2-3 cloves
  • 3-4 cashews 
  • 1 tsp melon seeds (char-magaj)
  • 1 tsp poppy seeds

Preparation - Soak cashews, poppy seeds and melon seeds in warm water for 30 mins.

Clean the mushrooms by rubbing them on a rough kitchen towel before then washing under running water. Slice them along the length.

Cut the paneer into cubes and immerse in salted water.

Cooking - Heat 1 tsp oil in a wok. Add the cardamom, cinnamon and cloves. Fry till fragrant.

Add onion, ginger and garlic cloves . Fry till raw smell goes off.

Add the chopped tomato and fry till they soften a bit. Finally toss in the soaked cashews and fry for 2 mins.

Remove from flame and keep aside till it cools down. Grind into a smooth paste and keep aside.

Heat the remaining oil and butter in the same wok. Add the masala paste and fry for 2-3 mins before adding the sliced mushrooms.

Turn up the heat and fry the mushrooms till they leave most of their water.

Sprinkle the red chili powder, turmeric powder and the Tata Sampann Paneer masala. Fry for 3-4 mins before adding about 1 1/2 cups of hot water. Adjust salt.

Bring to a boil before letting it simmer. Once the gravy is done, sprinkle garam masala and toss in the paneer cubes . Switch off the flame.

Garnish with chopped cilantro before serving.


Thank you Tata Sampann for sending over this box full of nostalgia !


Friday, October 7, 2016

Makhana Malai Matar ( Navratri special No-onion No-garlic recipe)

Sattvik food has it's own health benefits. It detoxifies the body and improves one's stamina. At times, it is often referred to as the yogic diet as it is the preferred diet of ascetics who can endure long periods of meditation without food and water. To enable the body to adjust to such extreme conditions, it needs to be brought to a state of balance by following pure eating habits. Because the emphasis is more on the seasonal produce, ghee, nuts, whole grains and dairy products, consuming a Sattvik diet ensures that less amount of preservatives make their way into the body.

While it is tough to make the switch for people who are used to non-vegetarian food on a regular basis, one must try and adopt a Sattvik diet on certain days of the month. It is best when done on a periodic basis and also in moderation. The 'Kartika' and 'Margasira' months in the Odia calendar offers have earmarked days when one has to stick to a Sattvik diet. On these days, the usual dishes prepared in most Odia homes are Dalma (dal with vegetables), sagaw bhaja (stir fried green leafy vegetable), khatta ( sweet tangy chutney) and a few stir fried vegetables like raw banana, yam, radish or drumsticks . No onion or garlic is used in any of these preparations.

However, it sometimes happen that guests do come over on such days. And it becomes necessary to cook some universally accepted dishes for them. Especially for those folks who prefer North Indian food. This 'Makhana Malai Matar' is one such light gravy based dish that goes well with puris or rotis.

Read on for the recipe -


Preparation Time- 20 mins

Ingredients -


  • 1 cup Makhana / puffed Fox-nuts
  • 1/3 cup green peas
  • 1/4 cup Malai or cream
  • 1 tsp Kasuri methi
  • 2 pinch garam masala (optional)
  • 2 pinch turmeric
  • 2 tsp ghee ( use oil if you prefer )
  • salt to taste


For the gravy -


  • 1/2 inch finely chopped ginger
  • 3 tsp chopped coriander stems
  • 2 dry red chilis (less spicy)
  • 1 green cardamom
  • 1 inch cinnamon
  • 2-3 cloves
  • 1 medium sized tomato
  • 7 cashews ( soaked for 1-2 hours )
  • 1 tsp oil
  • a pinch of salt

Preparation - Heat 1 tsp of ghee in a pan. Add the Makhana and roast to a golden. Remove and keep aside.

Add 1 tsp oil to a wok. Add the whole spices and chilis. Wait for 20 seconds. Once fragrant, throw in the ginger and chopped coriander stem. Fry for 2-3 mins or till the raw smell of ginger goes off.

Finally add the tomato and sprinkle the salt over it. Cover for 2 mins to soften a bit. Once the tomatoes are mushy, add the cashews and fry for 1 minute. Remove from flame and keep aside.

Transfer to a blender jar once it has cooled down. Add 1/5 cup of warm water and blend into a smooth paste.

Cooking - Heat the remaining ghee in the wok. Throw in the green peas. Fry then for 2-3 mins.

Then add the masala paste and cook till the oil separates. 

Add 1 cup of warm water, turmeric, garam masala and Kasuri methi. Adjust the salt. Bring to a slow boil.

Let it simmer for a while before adding the malai or cream. 

Add the roasted Makhana just before switching off the flame.

Serve hot with rotis or puris. Goes well even with jeera rice.


For more recipes without onion and garlic check here -


Thursday, August 11, 2016

Savoury Tricolor Panna Cotta ( Independence Day Collaboration with ADollopOfThat and DelishPotpourrie)

IMP - This i an original recipe created by the blogger and has been published for the first time on Oriyarasoi. 


"Mommy, Aarav is so bad ! "

"Why ? What happened ? "

" He does not play Cricket with us."

" So what ?"

" Why doesn't he like to play Cricket ?"

" But he plays football with you, doesn't he ? I think he is just like your Mommy. Even I prefer football. Guess we are just a little bit different . "

Diversity. A beautiful word that is fast losing it's relevance in a world where intolerance is constantly rearing up it's ugly head. That is why it is all the more important that we should be having this kind of conversation with our kids on this Independence day or rather on any day when we feel that he or she is showing any signs of parochialism. For a nation that revels in it's diversity, we need to make sure that the basics of it are ingrained into the next generation.

And with diversity occupying the topmost echelon of my mind, I set about with the task of creating a dish that pans the Indian subcontinent. Choosing the three recipes that represented the three regions of India was the toughest task. But after a lot of deliberation I picked Palak Paneer from the North, Erissery (Pumpkin curry) from the South and Dahi Baingan from Odisha ( just being true to my roots ). Now I wanted to give it a whole new avatar which deifies their regular hierarchy in the main course. Hence the introduction of the savory panna cotta, a light as air and tongue tickling appetizer that leaves you wanting for more. Of course one can serve them in a tiny-weeny portion as a palate cleaner too but I would rather go for the first option.

That's not all !! This recipe is part of a collab with my favorite bloggers Saswati ( of Delish Potpourrie ) and Parinaaz ( of A Dollop Of That ) so there is much more to be explored :) . [ Remember to scroll down to the bottom of this post ]


Read on for the recipe -

Preparation Time - 45 mins ( plus more time for setting the panna cotta )

Ingredients -

For the Palak Paneer Panna Cotta -

  • a fistful of baby spinach leaves
  • 1 inch sized cube of paneer
  • 2 tsp chopped onions
  • 2 garlic cloves
  • 1 pinch garam masala
  • 1 tsp gelatin 
  • 1/4 cup fresh cream
  • salt to taste
  • 1/2 tsp butter for frying the onions

For the Pumpkin Erissery Panna Cotta -
  • 1/2 cup red pumpkin cubes
  • 3-4 curry leaves
  • 2 garlic cloves
  • a pinch of cumin powder
  • a pinch of red chili powder
  • 2 tsp chopped shallots
  • 1/2 tsp oil
  • salt to taste
  • 1 tsp gelatin
  • 1/2 cup coconut milk
  • 1/4 cup fresh cream


For the Dahi Baingan Panna Cotta -

  • 1/2 cup eggplant slices
  • 4-5 curry leaves
  • a pinch of roasted cumin-chili powder
  • 1/2 tsp sugar
  • 1 tsp oil 
  • salt to taste
  • 1 tsp gelatin
  • 1/4 cup fresh cream
  • 1/2 cup hung curd


Preparation - Soak each teaspoon of gelatin with about 3 tbsp of water in three separate bowls. Once it swells up, place the bowls in a saucepan of hot water and stir them to dissolve completely.

Cooking -

For the Palak Paneer Panna Cotta -

Blanch the baby spinach leaves.

Heat a little butter in a wok. Add the onions and garlic. Fry till onion turns translucent.

Take the blanched spinach, garam masala, fried onion and garlic, and the paneer cube in a liquidizer jar.  Blend well. Then add the liquid gelatin and blend again.

Around the same time, simmer the fresh cream for about 5-7 mins in a thick bottomed saucepan. Season with salt and remove from the flame. Add the pureed mixture to the cream and beat lightly to mix evenly.

Pour into moulds/ramekins/glasses. Put inside the fridge for 30-40 mins to chill. Remove just before serving.


For the Pumpkin Erissery Panna Cotta -

Heat the oil in a wok. Add the curry leaves and let them turn brown. Remove and keep aside.

Add the garlic and shallots . Fry lightly. Next add the pumpkin cubes along with the cumin and red chili powder.

Add a little water, salt to taste and cover with a lid. Once the pumpkin is cooked through, remove from the flame.

Blend the pumpkin along with the liquid gelatin.

Around the same time, simmer the fresh cream and the thick coconut milk for about 5-7 mins in a thick bottomed saucepan. Season with salt and remove from the flame. Add the pumpkin mixture to the cream and beat lightly to mix evenly.

Pour into moulds/ramekins/glasses. Put inside the fridge for 30-40 mins to chill. Remove just before serving.


For the Dahi Baigana Panna Cotta -

Heat a little oil in a pan. Add the curry leaves and remove after 30 seconds. Add the eggplant slices along with a little salt. Cook till lightly browned on both sides.

Once the eggplant has cooled down, blend it along with the hung curd, roasted cumin-chili powder, liquid gelatin and salt.

Around the same time, simmer the fresh cream for about 5-7 mins in a thick bottomed saucepan. Season with salt and sugar. Remove from the flame. Add the eggplant and curd mixture to the cream and beat lightly to mix evenly.

Pour into moulds/ramekins/glasses. Put inside the fridge for 30-40 mins to chill. Remove just before serving.


Garnish as per the images or use your own imagination.


Note - This tastes best when served on the same day. The flavors tend to change after a day or two.

And here are the fabulous recipes shared by my friends -


Parinaaz's Rice Paper Rolls


and


Saswati's Tiranga Rabri Mousse


Happy Fooding around on this Independence Day !!! 

Saturday, July 30, 2016

Paneer Tawa Pulao ( Lunchbox special )

I love making various kinds of rice dishes for my kid. They are super easy to make and very much filling. Adding veggies, eggs, paneer, beans or even chicken boosts the overall nutritional profile of the dish. Plus there is the taste factor which is the ultimate clincher !

Tawa rice is a just another kind of pulao which is cooked on a shallow vessel which allows each grain/vegetable to get coated with the oil/ghee/butter and gives it a slightly burnt/smokey (depends on how long you prefer to cook) flavor .

This time I made Tawa pulao with some leftover paneer cubes and veggies. Used very less spices as per my kid's request so you will need to add more as per your taste. Read on for the recipe -


Preparation Time - 10 mins

Ingredients -

  • 1 1/2 cups cooked Jeera rice 
  • 100 gm paneer (cut into small cubes )
  • 1/3 cup green peas
  • 1/4 cup chopped carrots
  • 1/2 of an onion (chopped into small pieces)
  • 1/2 tsp finely chopped garlic
  • 1 inch long cinnamon
  • 2-3 cloves
  • 1 green cardamom
  • 1 bay leaf
  • 1 red chilli whole ( less spicy )
  • a pinch of garam masala
  • 1 tsp ghee
  • 1 tsp butter
  • salt to taste
  • cilantro for garnishing

Preparation - Put the paneer cubes into a bowl of warm water to which you have added sufficient salt. Let it soak for 5-6 mins.

Cooking - Heat the ghee in a skillet. Add the paneer cubes (drained on a kitchen towel) and fry on low heat to a golden brown. Remove and keep aside.

Add the whole spices and fry till fragrant. Now add the garlic and fry to a light brown. 

The onions go in next. They need to be fried till translucent .

Put in the veggies, sprinkle a bit of salt and turn up the flame a bit. Sprinkle water at regular intervals and let the veggie cook in the steam and brown up a bit at the same time.

The rice goes in at last along with the paneer cubes. Season with salt and garam masala. Turn up the flame as you toss the ingredients to distribute the flavour evenly. Garnish with chopped cilantro and remove from the flame.

Serve warm/hot with some kachumbar or even pickle.


Note - Have used a steel tiffinbox for the presentation to create an awareness about the need to ditch plastic. It is not only harmful for the environment but the chemicals leached when we put hot food in plastic containers are carcinogenic in nature. Let us join hands and make a pledge to reduce the use of plastic with this post !

Tuesday, June 28, 2016

Aish-el-saraya ( A Luscious Lebanese Pudding for Ramadan )

Orange blossoms. Rose water. Toasted pistachios. Some of these heavenly ingredients they put in the Middle Eastern desserts just makes me wonder if any of those aromas would be still be lingering in the air after nightfall and adding to the magic of the Arabian nights. Just the vast expanse of white sand, the deep blue canopy of the sky punctuated with a million twinkling stars and the air smelling of roses. Quite the setting to imagine the legendary romance of Alladin and Jasmine.

That bring me to another kind of love. The love for good food. And Ramzan is quite the right time for spreading some foodie love. 'Aish-el-saraya' is one of those luscious middle eastern desserts that can make one forget all about keeping a tab on the calories. It glides like velvet in the tongue and bombards the senses with a zillion delicious sensations that cannot be called anything unlike an orgasm. Yeah, it's that sinful and addictive too. But the good part is that it is quite easy to whip up. Sadly, it takes a while to set.

There are quite a few recipes for 'Aish-el-saraya' floating about on the net. I got mine from Youtube channel 'Heghineh Cooking Show'. It is run by an Armenian Youtuber who makes these really nice real-time videos and is also a mum with a kid running amok in the kitchen. No surprise that she has all my sympathy and support too. Have put the video at the bottom of this page.

Read on for the recipe -


Preparation Time - 40 mins ( plus loads of standby time )

Ingredients -

  • 1 packet of rusk 
  • 1/2 liter milk
  • 2 tbsp cornflour
  • 1/2 cup sweetened condensed milk
  • 2 cups whipping cream
  • 1 tsp rose water
  • 1 tsp orange blossom water or syrup ( I could not find it hence skipped )
  • sliced/crushed pistachios for the garnishing 


For the syrup -


  • 1 cup water
  • 1 cup sugar
  • 1 tsp rose water
  • juice of 1 lemon


Preparation - Take the bread rusk in a food processor. Pulverize into a fine powder.

For making syrup, take 1 cup water and 1 cup sugar in a saucepan. Bring to a boil and let it boil for 4-5 mins.

Remove from heat and them add the rose water, orange blossom water and lemon juice.

For making the custard, take 1 cup milk and dissolve the cornflour in it. Bring the rest of the milk to a boil, add the cornflour paste and whisk it till it becomes thick. Dissolve the condensed milk and remove from the flame.

Add the rose water and orange blossom water to the custard and mix it in.

Finally when it cools down somewhat, add the whipped cream to it and fold it in.

For the layering - Take a deep glass dish ( 1.2 lt capacity ).

Mix the powdered rusk with just enough sugar syrup in a mixing bowl. Transfer to the deep dish.

Spread into a uniform layer and tap it all over with the bottom surface of a bowl to pack it tightly.

Pour the custard and whipped cream mixture over it.

Sprinkle the pistachios all over the cream mixture. Put it in the fridge and let it set for 6-7 hours.

Just before serving, remove it from the fridge. Cut it carefully and drizzle some over the remaining syrup over the slices.


Enjoy this delectable dessert for Ramadan !!


Tuesday, April 19, 2016

Marwadi Bhindi ( or Besanwali Bhindi )

Bhindi or Okra is one of the most versatile vegetables. Available throughout the year and easy to prepare, it is omnipresent in our lunch/dinner menu. From a plain stir fried version to a more dressy stuffed one and even as a sweet-sour gravy, we love it in all forms. But during fasting days, I get into a quandary as most of our odia recipes use garlic along with Bhindi. That's one of the reasons why I am always on the lookout for 'no onion no garlic' recipes.

Surfing through the net, I chanced upon this easy fried Okra recipe by Sanjeev Kapoor. The fragrant chick peas flour and spices coat the okra and form a thick layer of powdery deliciousness over the crisp veggies. It was a hit with the family and I ended up making it three times within the span of five days.

Read on for the recipe -


Preparation Time - 20 mins

Ingredients - 

  • 15 medium sized okra
  • 4 tbsp besan or  chickpea flour
  • 1/2 tsp red chili powder
  • 1/4 tsp amchur
  • 1 tsp coriander powder
  • 2 tsp turmeric
  • 1/4 tsp garam masala
  • 2-3 tsp canola oil
  • 1 tsp ghee 
  • salt to taste
  • lemon juice for garnishing
  • cilantro for garnishing

Preparation - Cut the okra into diagonal pieces.

Cooking - Heat the oil in a nonstick skillet. 

Add the okra and fry till crisp. Remove and keep aside.

In the same skillet, add the ghee. Add the besan and fry till fragrant. 

Add the coriander, amchur, chili powder, turmeric and garam masala. Fry for 30 seconds.

Add the okra, sprinkle a few teaspoons of water and fry till the vegetables are evenly coated. Remove from the skillet.

Garnish with lemon juice and chopped cilantro.

Serve immediately .

Thursday, March 3, 2016

Pan-seared Spinach and Potato Cigars ( with a Sour cream dip )

IMP - This i an original recipe created by the blogger and has been published for the first time on Oriyarasoi. 


Six ingredients in common. One main course. One dessert. No omitting any ingredient for either course. On top of that it has to make the cut. Gourmet. Nothing less for the esteemed judges. Sounds like a Dr. Jekyll and Mr Hyde situation, doesn't it ? Well, it is part of a cooking contest that I am participating in. Looks tough but then what fun is a contest that does not challenge your limits. Well, when the going gets tough, the tough get going. For one, I am gonna treat this as some much needed motivation for blogging regularly.

So, here is the main course dish that I decided to create. The mashed potato uses just a drizzle of olive oil, a dash of salt and a bit of chili flakes. It is rolled in spinach leaves and seared on a pan which has been sprayed with olive oil and sprinkled with chili flakes. End result ? Melt in the mouth cigars that have a beautiful burnt aroma of chili and spinach. I served this with a drizzle of sour cream seasoned with brown sugar and salt. Frugal. Elementary. And yet orgasmic.

Read on for the recipe -


Preparation Time - 20 mins

Ingredients -

For the cigars -


  • 2 medium sized mashed potatoes
  • 10 spinach leaves (look for ones that are little big in size)
  • 1 1/2 tsp olive oil
  • 1/2 tsp chili flakes
  • salt to taste


For the dip -


  • 3 tsp sour cream
  • 1/2 tsp brown sugar
  • a pinch of salt

Preparation -  Take the sour cream in a bowl. Add the brown sugar and salt. Beat till dissolved and a little fluffy.

Cooking - Bake/boil the potatoes. Allow then to cool down.

Peel them and mash roughly. Pass the mashed potatoes through a steel sieve into another bowl. Repeat this procedure twice to get satin smooth texture.

Add 1 tsp olive oil and 1/4 tsp chili flakes to the mashed potato. Mix well.

Wash the spinach leaves and remove the stems. Dip them in boiling one for 1-2 seconds and remove immediately into a bowl of cold water. Dry the blanched leaves on paper towels.

Take a teaspoon of the mashed potato and place it in the middle of a spinach leaf. Roll it into a cigar. Roll another 1-2 spinach leaves around it to give it volume. 

Heat the remaining olive oil on a pan. Sprinkle the chili flakes on the pan. Place the cigars on the smoking hot pan and cook them on high for 1-2 mins or till they are seared to a brown on all sides.

Remove and place on the serving tray. Drizzle the sour cream dip over each cigar.

Serve immediately.


Note - Make sour cream at home. Take any heavy cream / whipping cream you have. Add some vinegar to it. Beat with a whisk till fluffy. And voila, you never need to buy sour cream again.

Monday, May 25, 2015

Stuffed Chachindra (Snake gourd)

Forget the zucchini boats or even the stuffed peppers ! This is a homegrown Odia dish that is as good as the imported ones. A rich stuffing of onions, freshly grated coconut and broken cashews lend this dish a sweet and rich taste. Some folks avoid adding potatoes to the stuffing but I just cant do without it.

And moreover this is one native dish that really looks beautiful without much effort on the presentation. I mean I have been working on my food photography skills to be able to click some decent photos of the food that I so painstakingly prepare. While I do not buy the logic of making food so good that one wants to take it home instead of eating it, I want my food to look presentable to a given degree. Sadly our dishes lacks the right amount of color but make up for it with the great taste.

Read on for the recipe -


Preparation Time - 30 mins

Ingredients -

  • 1 medium sized snake gourd (chachindra)
  • 3 tsp oil
  • a pinch of salt

For the stuffing -

  • 2 medium sized potatoes (boiled, peeled and lightly mashed)
  • 1 large onion 
  • 1 cup grated coconut (chopped into medium pieces)
  • 1 tsp grated ginger
  • 1-2 green chilis (chopped into small pieces)
  • 1/4 tsp cumin seeds
  • 1/3 tsp red chili powder
  • 1/4 tsp coriander powder
  • 2 pinch garam masala
  • 2 pinch turmeric
  • 2 tsp oil
  • salt to taste

Preparation - Wash and peel the snake gourd. Chop into 3 inch long pieces. Hollow them out by removing the mushy insides.


Cooking - Heat 2 tsp oil in a wok. Add cumin seeds and chopped green chillis. Wait for them to start spluttering.

Follow with the grated ginger and fry for 1 minute. Add the chopped onions and fry till red on the edges.

Add all the powdered masalas and fry for 2 mins. Finally add the potatoes and stir fry for a couple of minutes till everything is nicely mixed.

Add the grated coconut just before removing from the flame. Keep aside it is just warm to touch.


Stuff this into the hollowed out snake gourd.

Heat a wok or skillet on a low flame. Add the remaining oil. Place the stuffed snake gourd pieces on the skillet and sprinkle a little salt over them. Cover with a lid. Remove the lid at regular intervals and turn them on their sides.

Let it cook on a low flame till completely done. Remove from the skillet .

Garnish with some more grated coconut and cilantro. Serve hot with white rice and dal . 


Wednesday, May 20, 2015

Dahi Waley Tinday

Yes. It is yet another tinda recipe ( plz excuse me for doing those back to back). And a quite simple one at that. It reminds me of the 'Dahi-aloo' that I make quite often. Lazy, refreshing and quite good with a couple of rotis. Perfect for the hot summers .

Read on for the recipe -


Preparation Time - 10 mins

Ingredients -


  • 1 cup apple gourd /Indian baby pumpkin /tinday (peeled and chopped into medium sized cubes)
  • 1 cup yogurt
  • 1/4 tsp mustard seeds
  • 1/4 tsp grated ginger
  • 1/4 tsp cumin seeds
  • 1/4 tsp fennel seeds
  • a pinch of asafoetida
  • 1 green chili
  • 1 tsp oil
  • salt to taste
  • cilantro for garnishing

Preparation - Take the cumin and fennel seeds. Pound them into a coarse mixture.

Take the yogurt in a mixing bowl and beat lightly to break any lumps. Add a little salt .Mix.

Cooking - Heat the oil in a pressure cooker. Add the asafoetida followed by the mustard seeds and the broken  green chili. Once the chili turns somewhat brown, add the pounded spices. Stir fry for 10 seconds.

Add the chopped apple gourd and mix with the spices. Add very little water (3-4 tbsp), salt and close the lid. Cook for 1 whistle on medium flame.

Remove from the flame and keep aside for 10 mins.

Open the lid and transfer the contents into the mixing bowl containing the curd. Sprinkle chopped cilantro.

Serve at room temperature with rotis or jeera rice. 


Tuesday, May 19, 2015

Tinday ki Subzi ( Curried Apple gourd )

'Tinday' or 'tindi' happens to be one of those vegetables that I had never came across during the first twenty years of my life. It was only when I started working and had this Delhi girl as a room-mate, that I was introduced to this vegetable. But with her limited cooking skills, the first time we tried cooking this vegetable, it turned out to be disastrous.

And I never got around to trying it again till last month when a neighbor told me about this really simple recipe that she got from her 'Nani' . I tried it and quite loved it. And from then, I started experimenting with this vegetable. The recipe that I am sharing today is one of the spicier versions that one may come across but I am hooked onto it. Read on -


Preparation Time - 20 mins

Ingredients -


  • 2 nos Tinday /apple gourd
  • 1/2 cup curd
  • 1/2 tsp ginger paste
  • 1/2 tsp garlic paste
  • 2 tsp onion paste
  • 1/4 tsp coriander powder
  • 1/4 tsp red chili powder
  • 2 pinch turmeric seeds
  • 2 pinch garam masala
  • a pinch of asafoetida
  • whole spices ( 1 black cardamom, 1 green cardamom, 1 inch cinnamon, 2 cloves )
  • 1/2 tsp cumin seeds
  • salt to taste
  • 2 tsp oil

Preparation - Take the curd, ginger paste, garlic paste, half of the powdered spices and salt into a mixing bowl. Beat together. 

Peel the tinday and make a cross on each one till almost 2/3 of the length. Remove the seeds from inside. Add to the curd mixture and allow to marinate for 2-3 hours.

Cooking - Heat the oil in a pressure cooker. Add the whole spices and fry till fragrant. Remove and keep aside.

Add the cumin seeds followed by the asafoetida. Add the onion paste after 20 seconds. Fry till light brown.

Add the marinated tinda along with the marinade. Sprinkle a little salt. Close the lid and cook for 2 whistles on a medium flame.

Remove the cooker from the flame and keep aside till steam escapes. 

Open the lid and garnish with fresh cilantro .

Serve hot with white rice or rotis !!


Note - Will post another simple version in the next few days !!

Monday, April 27, 2015

Amritsari Alu Gobi

Amritsari Alu Gobi is a simple yet flavorsome Punjabi curry with a hint of a tang. The cauliflower florets and the potatoes are cooked to a very tender stage and as a result one gets a curry that has an almost mashed kind of texture. It goes great with some piping hot rotis !!

While it does remind me of our 'Phulakobi Jholo' or Odia cauliflower curry, this one has more tang, garam masala and almost zero bite when compared to the former. Call it an Odia thing if you wish, but we Odias prefer to have a bite to our veggies / meat. Almost like al-dente. And hence I take care not to overcook the cauliflower when I make this curry as my husband refused to eat it the first time.

Read on for the recipe -


Preparation Time - 40 mins

Ingredients:


  • 250 gm Cauliflower
  • 1 large onion
  • 1 large potato 
  • 2-3 green chilis
  • 2-3 tsp ginger garlic paste
  • 1 large + 1 medium sized tomatao
  • 1 tsp coriander powder
  • 1/2 tsp cumin powder
  • 1/4 tsp turmeric
  • 1 tsp red chili powder
  • 1/4 tsp garam masala
  • 1/3 tsp cumin seeds
  • 1/3 tsp mustard seeds
  • 2 pinch asafoetida
  • 1/4 tsp amchur (or as per taste)
  • 2 tsp kasuri methi
  • 1-2 nos green cardamon 
  • 1 inch long cinnamon 
  • 1-2 nos cloves
  • 1 no bay leaf
  • 5 tsp oil
  • salt to taste
  • 1/2 tsp sugar (my addition)
  • cilantro for garnishing


Preparation: Cut the cauliflower into medium sized florets. Potato should be cut into cubes.

Cut the onion into small pieces. Make a paste out of it and keep aside

Make a puree out of the tomato or chop into very fine bits.

Cooking: Heat 3 tsp oil in a wok. Add turmeric followed by the cauliflower florets and stir fry for 7-8 mins. Add the potato cubes and fry for 3-4 mins more. Remove from pan and keep aside.

Heat remaining oil in the same wok. Add mustard seeds, cumin seeds and whole spices. Fry till fragrant. Add the asafoetida and the chopped green chilis and fry for 30 seconds.

Add the onion paste along with the GG paste and fry till raw smell goes away. Add all the powdered masala (except amchur) and fry for 1 minute.

Add the tomato pureed/finely chopped . Cook till oil starts to separate out.

Add the fried florets and potatoes along with the kasuri methi, salt and 2-3 cups of water.

Boil for 8-10 mins or till the gravy thickens to ones' preference. Finally stir in the amchur powder and sugar just before removing from the flame.

Garnish with cilantro and serve hot with rotis/paranthas.


Saturday, February 21, 2015

Baby Corn Masala

With baby corn becoming popular in India sometime during the early twentieth century, another popular vegetarian dish captured the imagination of restaurant owners and their patrons alike. The Baby corn masala or Baby corn butter masala became part of the menu and has remained a popular choice ever since. The natural sweetness of the baby corn is accentuated and complimemted by a lightly sweet and rich gravy which has just the right amount of tang in it !!

Read on for the recipe -


Preparation Time - 40-45 mins

Ingredients -

  • 1 1/2 cup baby corn ( chopped into centimeter long pieces )
  • 1/2 cup capsicum (cut into strips)
  • 1 small onion (finely chopped)
  • 1 tsp Kashmiri chili powder ( I used the regular one so made it 1/2 tsp)
  • 1/2 tsp coriander powder
  • 1/5 tsp turmeric
  • 1/5 tsp garam masala
  • 1 1/2 cup milk
  • 1 tbsp Kasuri methi
  • 1 1/2 tsp honey 
  • 1 tbsp butter
  • salt to taste


For the gravy


  • 1 medium onion ( chopped into chunks)
  • 1 large tomato ( chopped into chunks )
  • 5-6 garlic cloves
  • 1 inch ginger (roughly chopped)
  • 1 1/2 tsp oil
  • a pinch of salt


Preparation - Heat a frying pan . Add the oil and thrown in the onions first and fry for 2 mins. Then add tomatoes, ginger and garlic. Fry for 4-5 mins and remove from the flame.

Allow to cool down a bit before making into a smooth paste.

Cooking - Heat the butter in a wok. Add the finely chopped onion and fry till translucent.

Add the chili powder, turmeric, coriander powder and garam masala. Roast for 10 seconds and then add the above paste. Fry for 2-3 mins before adding the baby corn. Sprinkle a little salt and cover with a lid. When the baby corn is half done, add the milk and bring it to a boil. Simmer till the baby corn is almost done.

Add the capsicum strips, kasuri methi and honey at this stage and allow to cook for 3-4 mins. Remove from the flame.

Garnish with a dollop of butter and chopped cilantro and serve hot. Goes best with Indian flat breads or a simple rice dish.

Wednesday, February 18, 2015

Dahi Kadhi/Kadhi Pakoda

Kadhi Chawal is a very popular North Indian meal. Immensely soothing and low on effort, it qualifies as comfort food on almost every level. Another good thing is that there are quite a many variations possible with it. I usually stick to a simple kadhi base (without any onions and garlic) while I keep changing the addons. Sometimes I go for the usual pakodas and at times tinge them with some greens ( palak/methi) . If I am in the mood for veggies, I fry some okra or eggplant or even tomatoes and add to the kadhi. And at my laziest best, a simply prepare the kadhi and put some store bought boondi (Haldiram's) in it !! Simple yet delicious :) .

This is the regular version of Kadhi Pakoda. Read on for the recipe -


Preparation Time - 30 mins

Ingredients -

For the Kadhi -
  • 1 cup dahi
  • 2 tsp Fortune besan ( I insist on this brand as it is best I have tried )
  • 1/2 tsp grated ginger
  • 1-2 finely chopped green chili
  • 21/2 cups water
  • 1/2 tsp sugar
  • a pinch garam masala (optional)
  • salt to taste
For the Tempering -
  • 2 tsp oil
  • 2 dry red chili
  • a sprig of curry leaves
  • 1/2 tsp mustard seeds
  • a pinch of fenugreek seeds
  • a pinch of cumin seeds
  • 2 pinch asafoetida

For the Pakoda -
  • 1/2 cup Fortune besan
  • 1 medium sized onion cut into thin long pieces
  • 2 tsp chopped coriander leaves
  • 1/2 tsp red chili powder
  • 1/4 tsp jeera powder
  • a pinch of garam masala
  • a pinch of amchur
  • pinch of baking powder
  • water to make a thick paste
  • oil for deep frying


Preparation -
For the kadhi - Take the curd in a mixing bowl. Beat it lightly  to break any lumps. Add everything else and mix well.

For the pakoda - Take all the ingredients in a mixing bowl and add water little by little to make a thick batter/paste.

Cooking - Heat sufficient oil in a wok for deep frying. Add spoonfuls of the pakoda mixture and fry till golden brown. Remove and keep aside on paper towels.


Bring the kadhi mixture to boil in a separate wok.

Heat 2 tsp oil in a tadka pan. Add broken/whole red chili, mustard seeds, cumin seeds, fenugreek seeds, asafoetida and curry leaves. When it starts spluttering, add it to the kadhi and boil for 15 mins on low flame. Finally add the pakodas and switch off the flame.

Serve immediately with steamed rice.


Note - The pakodas remain crispy when added at the end but if you want them to soak up some of the kadhi, add them 5 mins before switching off the flame or let it sit for a couple of minutes before serving.

Tuesday, February 3, 2015

Banana Stem Cutlets (Kadali Manja Bara/Tikki/Cutlet)

How many of you were disappointed when Gautam Gulati went on to win Big Boss Season 8 while Karishma Tanna was literally left stranded ?? Yeah, even Pritam went home with a cash prize of Rs 25 lakhs. India has once again proved that it prefers sons over daughters. While it is a much debated topic that Tanna's chances were adversely affected by her relationship with Upen Patel, Gautam escaped unscathed though he had a fling with a much older Diandra. The 'maa ka beta' or Mamma's boy images worked well with the audiences while that of a much independent woman ditching her old boyfriend for a new one obviously did not click. This is one debate that could go on and on but I would very much like to hear what most of you think about it . Do share your comments on this page.

And these banana stem cutlets are the perfect snacks to munch on while discussing about this development. Read on for the recipe -


Preparation Time - 25 mins

Ingredients -


  • 1 cup finely chopped banana stem 
  • 1 small onion (finely chopped)
  • 3-4 garlic flakes
  • 1/2 inch ginger
  • 1/2 tsp chili powder
  • 1/3 tsp garam masala
  • 1/4 tsp cumin powder
  • 2-3 pinch turmeric
  • 2 tsp besan
  • 1/2 tsp cornflour
  • 4-5 tsp oil
  • salt to taste
  • coriander leaves for garnishing
  • a handful of peanuts


Cooking - Dry roast the peanuts on a pan. Remove and keep aside till they cool down. Crush them lightly t break into smaller pieces.

Heat 3 tsp oil in a wok. Add the onions, ginger and garlic. Fry till onions turn translucent.

Add the banana stem pieces along with all the spice powders. Cover with a lid and cook for 12-15 mins till it becomes soft.

Allow the mixture to cool down slightly before transferring it to a grinder jar. Give it a whizz or two.

Transfer to a mixing bowl and add the besan, cornflour and chopped coriander leaves. Mix well and then divide into 5-6 equal parts. Shape each portion into a flattened disc. Roll it gently over the crushed peanuts.

Heat a non-stick tawa and drizzle the remaining oil on it. Place the discs on the tawa and cook on both sides till tiny brown spots begin to appear.

Serve hot with some chutney or raita.

Saturday, January 24, 2015

Shalgam Ki Subzi (Turnip Stir Fry)

It is difficult to find 'shalgam' or turnip in Odisha. Alteast ten to fifteen years back, I had never seen the vegetable being sold in the local markets. So, every time I came across this vegetable in Hyderabad or Bangalore, I would think about trying it out. But since I was not too sure about how it needs to be cooked, I kept postponing it till my vegetable lady egged me on to buy some. 'Didi, you can make it like Ol-kopi, they are similar in taste', she told me. And it turned out to be true. At first I had tried a spicier version just like I do it for Kholrabi  (Ol Kopi or Ganthi kobi). The leftover bits went into the 'Sarson ka saag'. The second time I bought the vegetable, I made a simpler version that works well for chapatis.

Read on for the recipe -


Preparation Time - 20 mins

Ingredients - 

  • 2 medium sized turnips ( peeled and cut into 3-4 mm thick pieces )
  • 1/2 of a small onion
  • 1/2 tsp GG paste
  • 1 dry red chili
  • 1/2 tsp cumin seeds
  • 1/4 tsp cumin powder
  • 1/2 tsp chili powder
  • 1/4 tsp turmeric powder
  • 2 pinch garam masala
  • 1 large tomato (finely chopped)
  • 3 tsp oil
  • salt to taste
  • cilantro for garnishing (optional)

Cooking - Heat the oil in a wok. Add the broken red chili and cumin seeds. Once it gets spluttering, add the chopped onion and allow it to turn translucent.

Add the GG paste and fry for 2 mins. Add the tomatoes along with all the powdered spices. Stir fry for couple of minutes till the tomatoes turn mushy and the oil starts to leave.

Add the turnip pieces, mix in and turn up the flame for 2 mins. Add about 1/4 cup water along with the salt. Cook with lid covered for 5-6 mins or till the turnip becomes soft.

Remove from flame and garnish with cilantro.

Serve hot with rotis !!


Check out a spicer version ( Masaledar Shalgam ) here !! ( Prepared it in the same way as I cooked the Kholrabi but did not post a separate recipe )

Thursday, January 22, 2015

Shahi Paneer ( A Truly Royal treat for the taste-buds)

I had not prepared any Panner dish for quite sometime as my husband had got bored with it. So, when I got some from the supermarket last week, I wanted to try out something different from the usual spicy gravies that usually make. After browsing through lots of recipes, I zeroed in on this simple recipe of 'Shahi Paneer' as it looks quite easy and less time consuming. I have avoided tomatoes as I wanted that white look and hence used some extra curd to get that tang into the gravy. But feel free to choose whichever you like.

Read on for the recipe -


Preparation Time - 30-40 mins

Ingredients -


  • 250 gm Malai Paneer
  • 1/2 cup thick yogurt
  • 1 tsp coriander powder
  • 1/2 tsp kashmiri chili powder
  • 1/4 tsp garam masala power
  • 1/4 turmeric
  • 1 tbsp makhan (white butter)/oil
  • a pinch of saffron
  • 3 tbsp warm milk
  • 2 tsp sugar
  • salt to taste


For the gravy -


  • 1 medium onion
  • 3-4 garlic flakes
  • 1 inch long ginger
  • 5-6 cashews
  • 4-5 almonds
  • 3 cloves
  • 3 green cardamom
  • 1 inch cinnamon
  • 2 pinch cumin (jeera)
  • 2 pinch shah jeera


Preparation - Soak the saffron in warm milk for 20 mins.

Boil 2 cups water in a small saucepan and add all the ingredients listed  under 'For the gravy' . Let it boil for 10 mins (else you can use a pressure cooker and cook all the ingredients for 2 whistles on a medium flame).

Allow to cool down before straining the water (do not throw). Grind the cooked ingredients into a smooth paste. Keep aside.

Cooking - Heat the white butter / oil in a wok. Add the paste that we have prepared in the previous step. Cook for 5-6 minutes till the oil starts to separate.

Add the coriander powder, chili powder, garam masala and turmeric at this point. Stir fry for 2 mins.

[Note - If you plan to use any tomato puree, add it at this point and cook for 4-5 mins]

Add the yogurt (whisked to break any lumps), strained water, sugar and salt to taste. Boil for 10 mins on a low flame (be careful as it tends to stick to the bottom).

Add the saffron milk and the paneer cubes. Simmer for 2 mins before removing from the flame.

Serve hot with naan or any other Indian bread. Also goes well with white or any mildly flavored rice.


Featured Post

Green Papaya Laddoos (SugarFree recipe)

Mom is undoubtedly the dessert specialist at home. God forbid, if she takes to blogging, she could give a lot of folks a run for their mone...